Introduction
ESP32 is a series of low-cost, low-power system-on-chip microcontrollers with integrated Wi-Fi and dual-mode Bluetooth.

Getting Started with the ESP32 Development Board:
Main Features:
- Low-cost: you can get an ESP32 starting at $6, which makes it easily accessible to the general public;
- Low-power: the ESP32 consumes very little power compared with other microcontrollers, and it supports low-power mode states like deep sleep to save power;
- Wi-Fi capabilities, wifi connect or wifi host.
- Bluetooth : supports Bluetooth classic and Bluetooth Low Energy (BLE) (100x less power).
- GPIO : ESP32 Pinout Reference
- Processor: Tensilica Xtensa Dual-Core 32-bit LX6 microprocessor, running at 160 or 240 MHz. The ESP32 is the ESP8266 successor.
- ESP32 Development Boards come with all the needed circuitry to power and program the chip.
- Compatible with the Arduino “programming language”.
- Compatible with MicroPython.
Comparison: ESP32 vs ESP32-S3 vs ESP8266
| Feature | ESP8266 | ESP32 | ESP32-S3 |
|---|---|---|---|
| Processor | 80 MHz, single-core (Tensilica L106) | 240 MHz, dual-core (Xtensa LX6) | 240 MHz, dual-core (Xtensa LX7) |
| RAM | ~80 KB | 520 KB SRAM | 512 KB SRAM + 8 MB PSRAM (optional) |
| Flash | Up to 16 MB (external) | Up to 16 MB (external) | Up to 16 MB (external) |
| Wi-Fi | 2.4 GHz, 802.11 b/g/n | 2.4 GHz, 802.11 b/g/n | 2.4 GHz, 802.11 b/g/n |
| Bluetooth | ❌ | BT 4.2 + BLE | BT 5 + BLE |
| USB Support | ❌ | ❌ | USB OTG (Native) |
| GPIO Pins | ~11 usable | 34 (some have special functions) | 45 (some have special functions) |
| ADC Channels | 1x 10-bit | 18x 12-bit | 20x 12-bit |
| SPI/I2C/I2S/UART | 2x SPI, 1x I2C, 2x UART | 4x SPI, 2x I2C, 2x I2S, 3x UART | 4x SPI, 2x I2C, 2x I2S, 3x UART |
| PWM | Yes | Yes | Yes |
| Deep Sleep Power | ~20 µA | ~10 µA | ~10 µA |
| PSRAM (Extra RAM) | ❌ | Optional (up to 8MB) | Optional (8MB default on some models) |
| AI/ML Acceleration | ❌ | ❌ | Yes (Vector instructions) |
| Security Features | Basic | Secure Boot, Flash Encryption | Secure Boot, Flash Encryption, AES-256 |
| Price (approx.) | $2-$4 | $5-$8 | $6-$10 |
✅ ESP8266 – Best for simple IoT applications where low cost and Wi-Fi are enough (e.g., smart switches, basic sensors).
✅ ESP32 – Good for general-purpose IoT, dual-core performance, Bluetooth support, and power-efficient applications.
✅ ESP32-S3 – Ideal for advanced applications requiring AI acceleration, more GPIOs, USB support, and improved power efficiency.
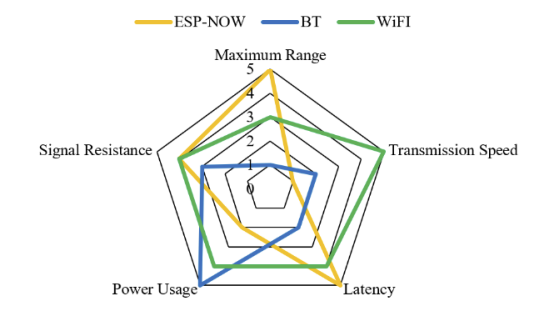
ESP32 communication
Comparative Performance Study of ESP-NOW, WiFi, Bluetooth (classic BT is used in the paper, which similar to WIFI, is designed to transmit data continuously)
- ESP-NOW, ESP32: ESP-NOW Web Server Sensor Dashboard (ESP-NOW + Wi-Fi)
- Bluetooth Two-Way Serial Bluetooth communication between two ESP32 boards
ESP32-CAM
Compatible with the Arduino “programming language”.
- Installing ESP32 Board in Arduino IDE 2. (attention if you are in a virtual env, when you try to install dependent python libs), install ESP32.
- Arduino IDE 2.3.3 has a bug that causes index downloads and installation/updates of boards platforms libraries to hang when Serial Monitor is open.
- Use board AI-Thinker ESP32-CAM.
- Try the example code project: ESP32-CAM Take Photo and Display in Web Server.
Documents:
ESP32-CANBUS
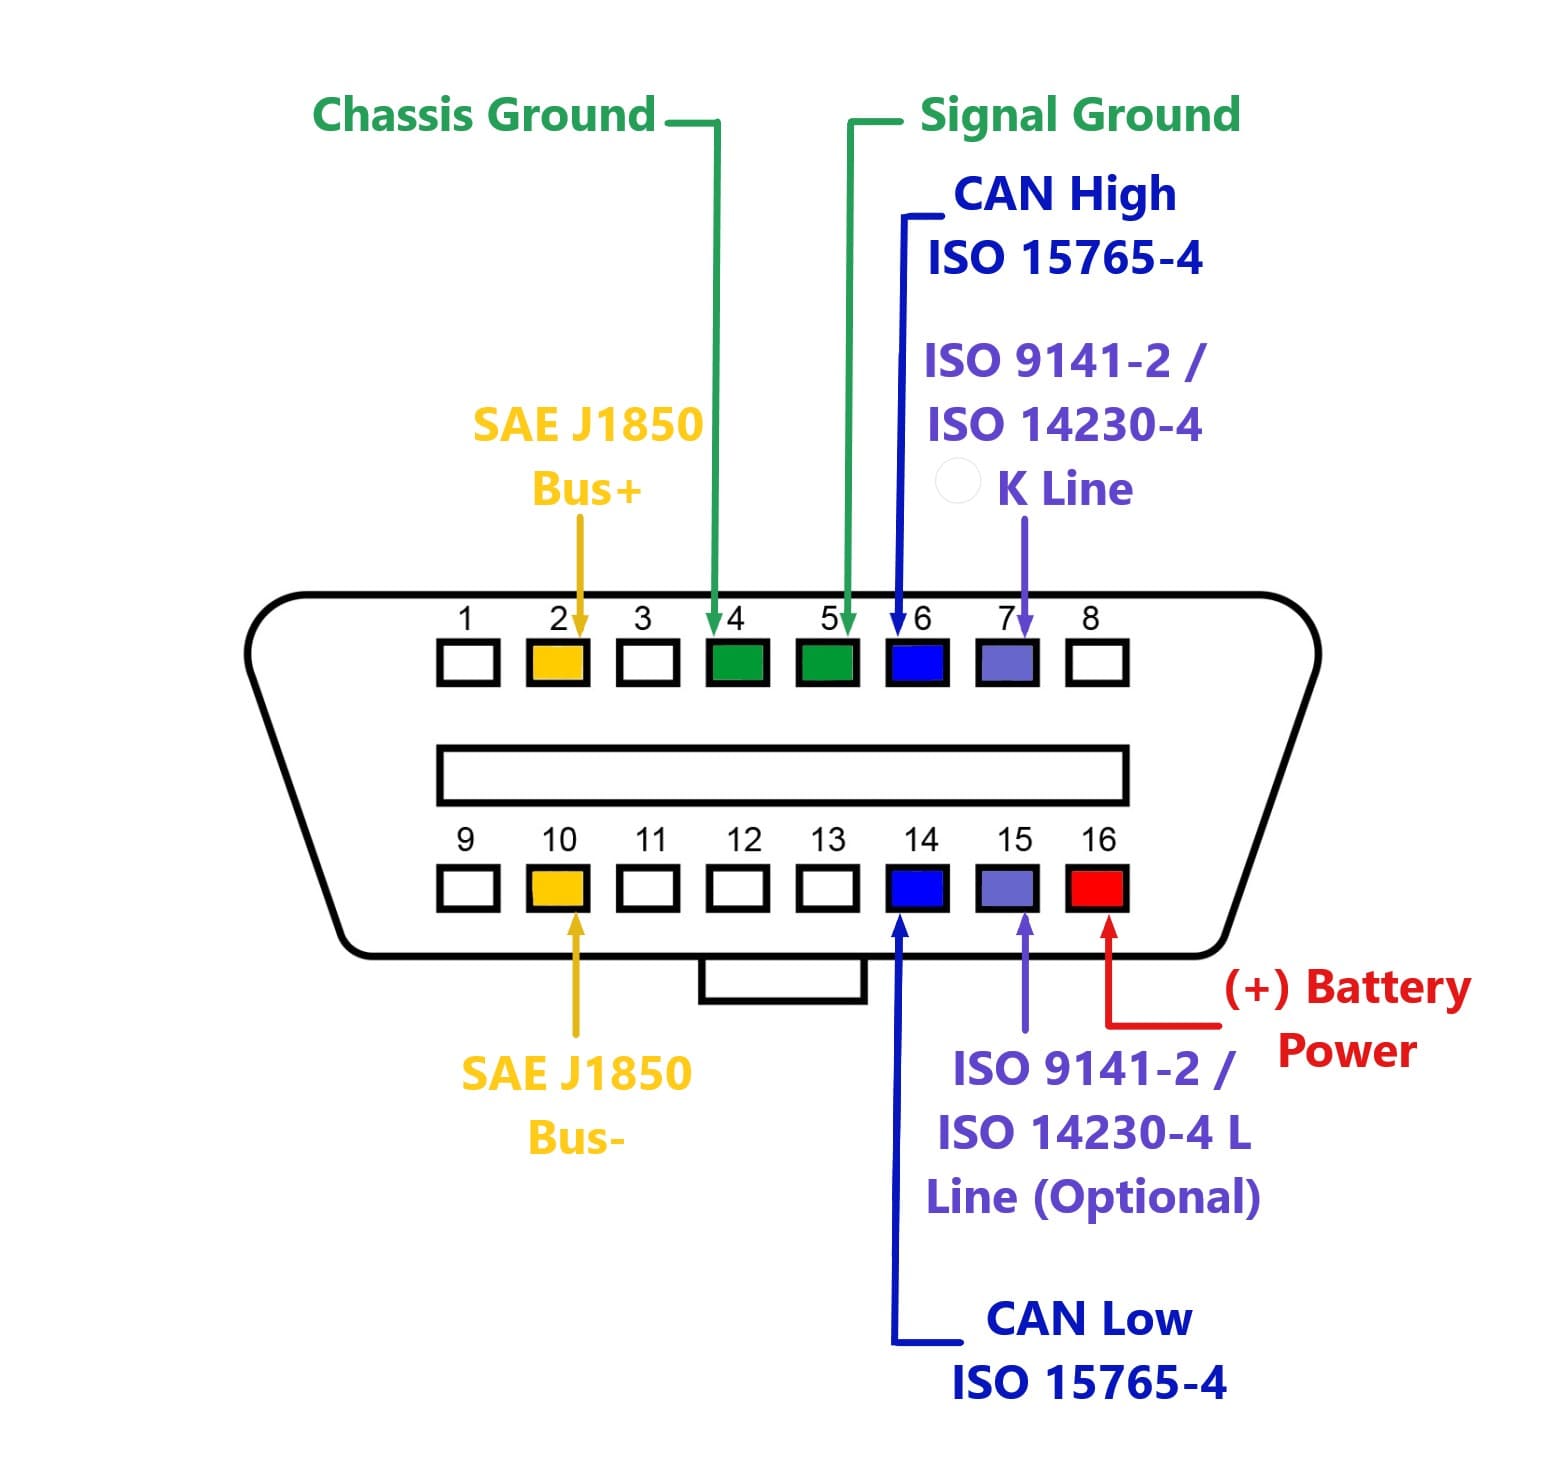
Explained! CAN BUS Diagnosis – How to Troubleshoot Faults OBD 2 Pinout Explained How to read the CAN BUS using SavvyCAN with an ESP32 using SavvyCAN
- CAN transceiver module :
- MCP2515 using TJA1050 : 5V, lower electromagnetic emission, no standby mode.
- Configuation tips : (1) Check the Crystal frequency - 8MHz - use
MCP_8MHZin MCP_CAN_lib; (2) Put a jumper link on J1 in order to enable the 120 OHM termination resistor ( This is necessary for reducing the reflections on the CAN lines ). - 车载OBD口出来的12V,质量很烂(充满各种噪声),所以(1)电源模块要选车规级或者抗干扰能力很强的;(2)稳压+滤波很重要;(3)电流能力要充足,不能只是够,最好富余一倍以上。
- Power source (car battery via 12V->5V converter).
- OBD-II to DB9 or bare wire cable (for connecting to car’s OBD-II port)
| MCP2515 Pin | Connects To ESP32 Pin | Description |
| VCC | 5V | Power supply |
| GND | GND | Ground |
| CS | GPIO5 | Chip Select (user-defined) |
| SCK | GPIO18 | SPI Clock |
| MOSI | GPIO23 | SPI Master Out |
| MISO | GPIO19 | SPI Master In |
| INT | GPIO4 (or 15) | Interrupt pin (optional) |
| MCP2515 Pin | ESP32-C3 SuperMini | Notes |
|---|---|---|
| VCC | 3.3V | ✅ Use 3.3V only (⚠️ do not connect 5V) |
| GND | GND | Ground |
| SCK | GPIO4 | SPI Clock |
| MISO | GPIO5 | SPI MISO |
| MOSI | GPIO6 | SPI MOSI |
| CS | GPIO7 | Chip Select (can be any free GPIO) |
| INT | GPIO3 (optional) | Interrupt pin (optional) |
Car Robots
- 梦丘MOS精灵机器人 ¥100 (using ESP8266).
- DASAI MOCHI HK$426 .
- 小米SU7官方配件智能双表盘 - ¥699. (车速、里程、表情)
- 蔚来 NOMI ¥4900 .
Problems
- LVGL with SD_MCC file reading.
- File system : LVGL’s file system template does not fit SD_MCC fs::File. we need to customize the file system functions for GIF files.
- Memory : ESP32 memory might not be sufficient,
lv_mem_alloccould fail - we need to enlarge memory size.
- LVGL Too Slow? Do THIS for Maximum FPS!
- (1) Use DMA (direct memory access), without involving CPU. (2) Double buffering, which gives mixed result. (2) Avoid full screen render mode.
static lv_color_t* draw_buf = (lv_color_t*)heap_caps_aligned_alloc(32, (LCD_WIDTH * LCD_HEIGHT * 2) / 6, MALLOC_CAP_DMA);lv_display_set_buffers(disp, draw_buf_1, draw_buf_2, (LCD_WIDTH * LCD_HEIGHT) / 6, LV_DISPLAY_RENDER_MODE_PARTIAL);
- Use LVGL9 (or take care using Meters in LVGL8).
- Active vs. Passive components. To limit active changing components.
- Increase LVGL limit :
LV_DEF_REFR_PERIOD.
- (1) Use DMA (direct memory access), without involving CPU. (2) Double buffering, which gives mixed result. (2) Avoid full screen render mode.
- LVLG icons, following LVGL doc using fontawesome with pro ttf.